
In this post I will follow a step by step process in creating a part of the Ferrari 250 GTO focusing on the front window area. I will further explain certain steps that could be done to make it more efficient and easier. It will also discuss upon previous metal shape making assignments, where the skills there can be effectively used to create the wanted shape.
Firstly beginning with an introductory reflection, as an Interior architect student I never considered using metal as a material for the interior or even as a concept model. However, this particular class allowed me to widen my knowledge of material study, and made me realise the generous possibilities of shapes that can be formed with metal. It allowed me to utilise other tools (mechanical and non mechanical) and even create my own tools (making shapes from wood) to make that distinct character/form in the metal piece. Even now, after a semester worth of learning, I still find it complicated to create or replicate the exact form of a model, but I am now able to somehow imitate a rough form of the model (even though it looks very deformed).
I will now explain the process of making the front window of the Ferrari 250 GTO:
STEP 1: CREATING THE BUCK
The 'buck' is literally the skeleton or the structure of the car. The buck is there so that we can understand the form and details that we need to create with the aluminium piece.
A .STL model was given to us, and all we had to do was import this file into a program called 123Make, which allows us to select the number of slices we are willing to have on the X,Y,Z axis.
*It is guaranteed the better to choose the 'waffle' form for it's strong rigid structural system, and also it's appearance of detail.
After choosing the number of slices, import into Illustrator so it can be cut using the laser cutter
*Think ahead before choosing the number of slices. Too many can make it hard to fix later as the gaps tighten the more you put in, but having too less can affect the detailing of the model. Try to make a demo model before fixing the whole thing


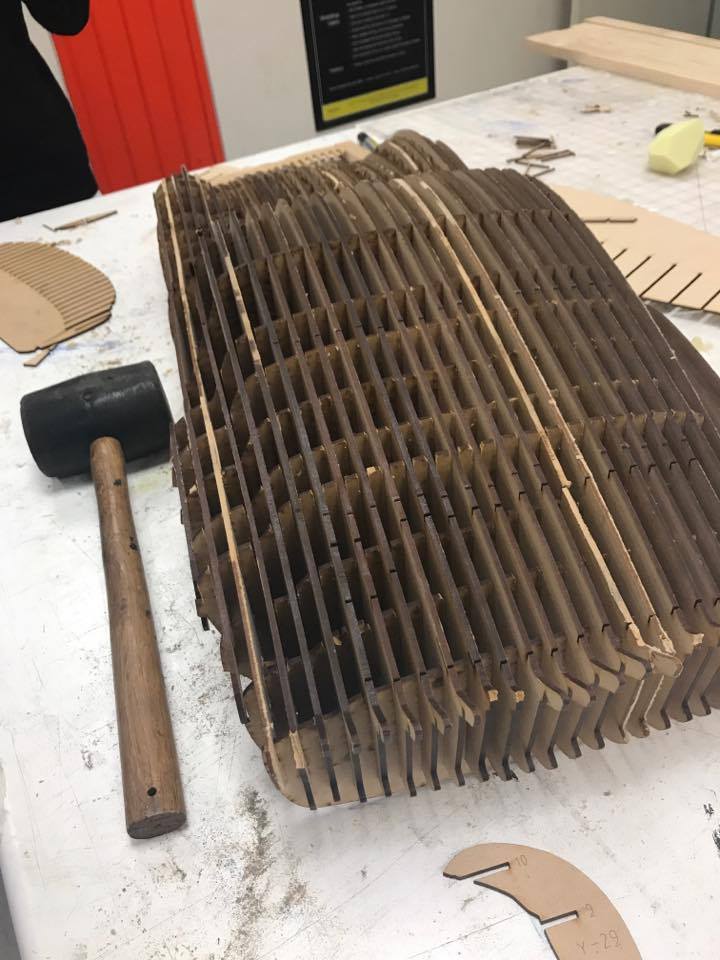
As evident the image above which shows my 'buck' has too many horizontal slices which made it very difficult to fix
STEP 2 : OUTLINE OF THE METAL PIECE
After the buck has been made, we would have to cut out a general rough shape of the part that you are going to make. Because it is impossible to put a rigid metal piece on top of a curved form and trace, it is easier to use a flexible material such as paper and trace on top of that, then draw that form onto the metal piece.
*I think it was preferable to use tracing paper due to it's flexibility but also because of it's transparent qualities.
*Another tip is to put masking tape all around the buck so you can draw how you are going to divide the parts when making

The part that this tutorial will discuss is the front window as shown on the image below. Hence using tracing paper or other form of paper, draw the outline of the piece and trace on top of the metal piece, then cut. Always sand off the rigid edges after cutting (not only for aesthetic reasons but also for safety.)

STEP 3 : USING THE ENGLISH WHEEL
In making the basic form of the car part, I personally began by using a round end mallet and stretching it like we did for the bowl to create that curvature structure, however, later on I realised that it could be formed by just using the English Wheel.

*So TIP: just use the English Wheel to make the basic form. More time efficient.
With a pretty tight grip, keep rolling it back and forth until the wanted form is made
STEP 4 : USING THE NYLON MALLET
Now we have to manually (non-mechanically) create the form. If you look at the image of the car, It has a dramatic curve when it becomes the roof of the vehicle. Due to it's sharp angle, it cannot be made using the English Wheel, hence the nylon mallet is used. Simply draw an imaginary or physical line where the curve is and start hitting it with the sharp end of the mallet. This will make that sharp curve.
*Do not hit it too hard, It will make a dent onto the other side, which means more work later to fix the problem.

STEP 5 : THE EDGE CURVING
If you look at the form of the front window part, the edges of the side sort of juts in. To make this, I used the skills that I learnt when making the torus. Simply get the curved metal shaper with a thickness similar to the curve needed. Place the edge onto the shaper and lightly hit using the flat head hammer
*Remember to hit it lightly and then constantly check again by placing onto the buck. Even a slight hit changes the shape a lot


IMAGE OF THE TORUS ASSIGNMENT
STEP 6 : SMOOTHING THE SURFACE
After this stage the form of the piece should be complete. However, it might still look like shit because of the hammer marks and random dents everywhere. This is where the english wheel comes in handy. With slight pressure, keep rolling it back and forth, to smooth the surface.
*If too much pressure is applied on the English Wheel, you will notice that the shape has also changed a lot
STEP 7: FINAL (MAKING IT LOOK GOOD)
To make it look pretty, I firstly sanded it with a less course sand paper. After sanded, metal polisher was applied for the finale finish!
*Final TIP: constantly check your piece with the buck when making! Constantly check if the piece is forming to the wanted shape.


FINISHED PRODUCT


